
App Support Center
The following information provides a detailed walk-through of the OT-Scan app installation, procedure and available support options. Looking for more information? Submit a request directly to our app support team by completing the email form at the bottom of this training.

OT-Scan App Installation Instructions
1. From the Home Screen, enter the App Store for the device.
2. Tap “Search” and search for OT-Scan Premier Biotech.
Note: In the event an auto download prompt appears, continue the installation.
3. Tap the app to enter the details screen, followed by the “GET” and “Install” buttons.
Once completed, the OT-Scan app icon will appear on the Home Screen.
Note: The OT-Scan app requires a different user/pass (Case Sensitive) than the Apple ID. Please contact Premier Biotech if these credentials have yet to be provided to you.
Supported OT-Scan Devices
Android
Android
IOS
NOT Supported
Samsung S8
Samsung S9
Samsung S10
Samsung S20
Samsung Note 9
Samsung Note 10
Samsung Note 20
Samsung S21
Samsung S22
Google Pixel 4a
Google Pixel 5
Google Pixel 6
Google Pixel 7
LG K51
LG V60 ThinQ
LG G7 ThinQ
Zebra TC50 series
iPhone 6s
iPhone 7
iPhone 8
iPhone X
iPhone 11
iPhone 12
iPhone 13
iPhone 14
iPhone 14 Plus
iPhone 14 Pro
iPhone 14 ProMax
iPod Touch
iPhone SE (2&3G)
iPad- All generations
Pay close attention to the timing requirements for each step outlined throughout this procedure course to ensure test validity.
")
Pre-Test Instructions
The Donor should avoid having anything including food, drinks, gum and tobacco products in their mouth for at least 10 minutes prior to specimen collection. To aid in collecting enough oral fluid, the donor should be instructed to pool oral fluid in their mouth prior to collection.

Preparing For The Test
1. Store OralTox tests at room temperature 36-86°F (15-30°C)
2. Check expiration date (noted on the OralTox device pouch) and ensure there are no tears or cuts to the packaging
3. Ensure there are no tears or cuts to the packaging
4. Open the pouch in front of the donor and place on a flat surface.
OralTox Screening Procedure
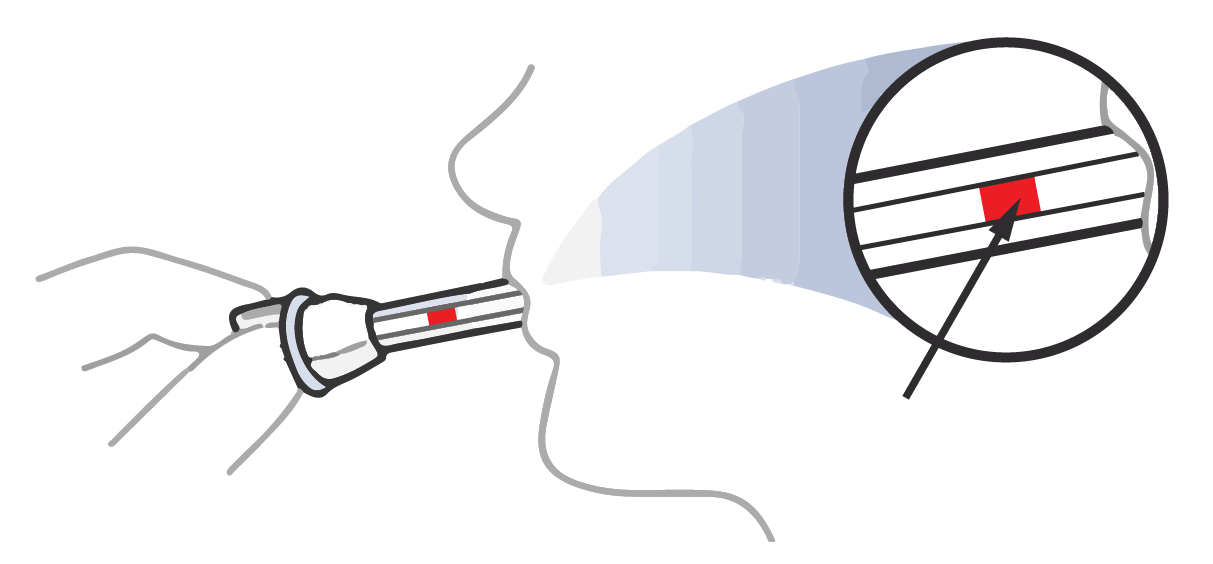
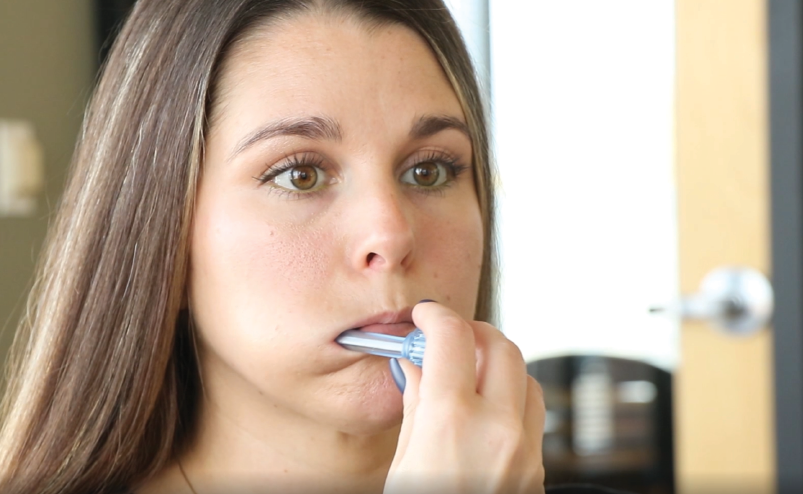
1. Request the donor remove the collection swab from the OralTox device and have them sweep the inside of mouth (cheek, gums, and tongue) and then hold swab in mouth until color on the saturation indicator strip appears, or 7 minutes has elapsed.
2. Instruct donor to remove collection swab from mouth and insert it sponge first into device, pushing and twisting down until the threaded handle locks tightly into place.
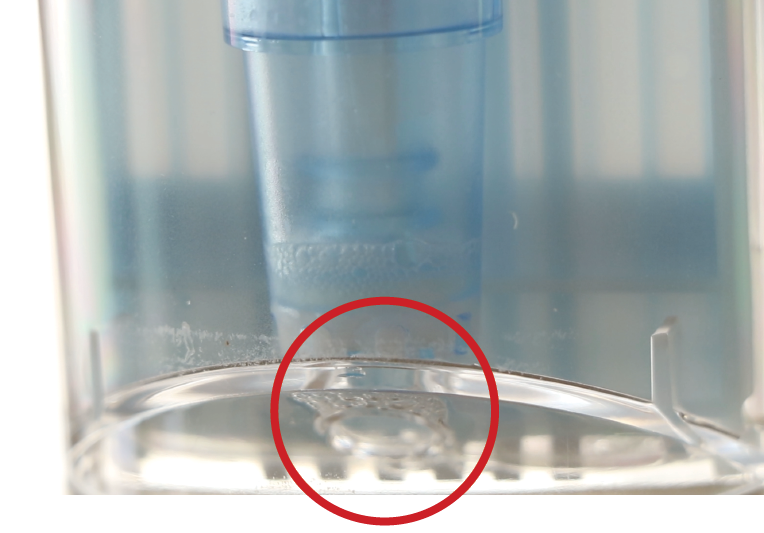
3. Set device upright on the flat surface and keep upright while test is running. Ensure that the oral fluid begins migrating upward, saturating the test strips. At this time, wait for the colored bands to appear in the test results area.
4. The OT-Scan app can be run as soon as two lines appear (control, test lines) for each test strip representing a negative result.
Important: Wait A Full 10 minutes before initiating the OT-Scan app procedure if no apparent color bands (control and test lines) appear in a test result area representing a presumptive positive result.

OT-Scan Mobile App Procedure
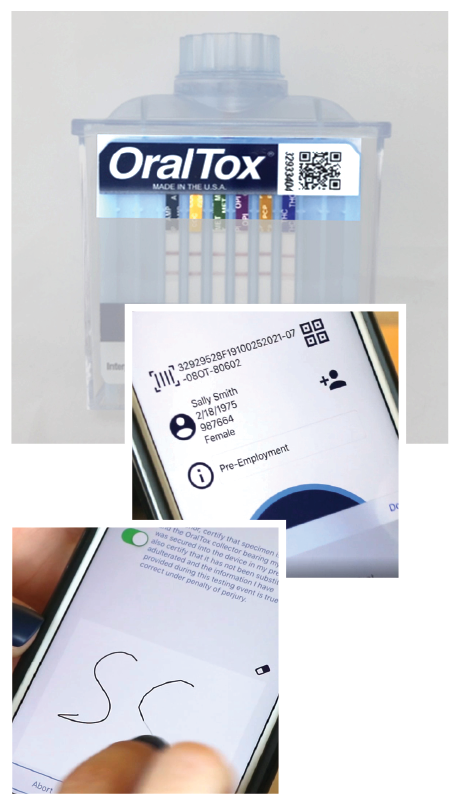
1. Open the OT-Scan app and sign-in using your assigned user name/password. At first login, read and accept the License Agreement.
2. Select the appropriate order type (Retrieve or Manual) to initiate the screening procedure.
If the donor information was previously entered, select Retrieve Order. When entering in a new order, select Manual Order to enter in the donor’s information.
Retrieve Order: For previously entered orders, either tap the Search Button to enter in the donor’s first/last name for retrieval. Alternatively, scan the assigned QR code using the device.
Manual Order: Select this when entering in a the donor’s details for the first time. Complete each field including name, date of birth, etc. The ID field criteria will be defined by your organization.
Note: The final two fields (CM Customer Name/ID) can be skipped unless requested by your organization. These are optional fields available to capture additional data. If your company is utilizing the QR code scanning function, tap the Scan Donor Detail Barcode Button to scan and pull in the donor information.
Once the information is complete, tap confirm.
3. Request the donor read and consent to testing by tapping the toggle icon and sign using their finger in the designated signature area.
4. Scroll through the tutorial screens to learn more about the collection procedure or tap the Skip Button to proceed.
5. Tap the Scan QR Code Button to initiate scanning. Align the window with the QR code to capture the device details.
6. Select the reason for testing and sign using your finger in the designated signature area.
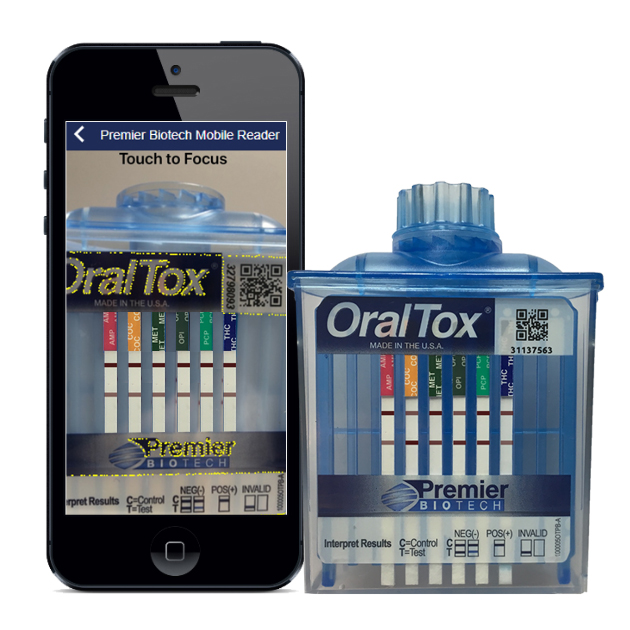
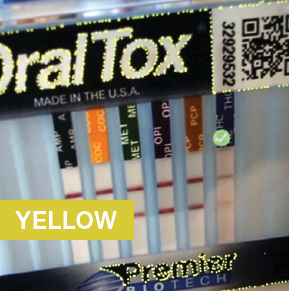
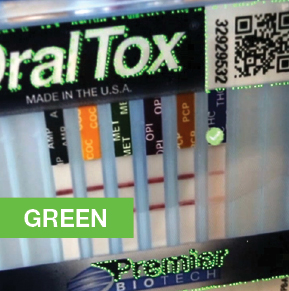
7. To capture the result, hold the phone approx. 2 inches away from the device, aligning the app indicator lines to the device label. Slowly pan the phone outwards (away from the device) tilting and aligning until the guided read indicator changes from red to yellow/green. While the guided indicator is green, hold the phone steady to allow the app to begin capturing the result. A blue progress bar may appear showing the progress.
8. Once completed, the results overview screen will appear as the data is being sent automatically to the designated data center. Tap the Details Tab at the bottom for additional information.
Print (Optional): Tap the print button to pull up the printer options screen. From here, chose the printer and select the number of copies to print.
Menu: Additional support information and the ability to view the procedure tutorial is available anytime in the menu.
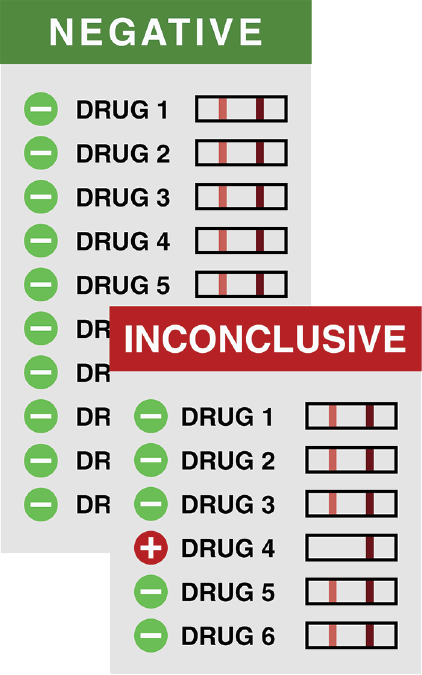
Negative
Following a negative result identified by the OT-Scan app, the donor/candidate’s drug screen is cleared to proceed and the OralTox device can be discarded in a regular trash receptacle. (Process Completed)
Inconclusive
(Non-Negative/Presumptive Positive): An Inconclusive result identified by the OT-Scan app will require the OralTox device to be shipped to Premier Biotech Labs or the donor/candidate referred to a designated collection site for confirmatory testing. Complete the following chain of custody and shipping procedure or follow your organizations protocol for non-negative results.
Invalid
Results from any test identified as Invalid, require the collector to discard the OralTox device and initiate another test. Please ensure all steps are followed properly throughout the procedure, including paying close attention to the timing requirements outlined throughout in Bold. (Conduct Another Test/Scan)
Confirmation Testing (Ordering The Lab Test – Inconclusive Results)
The OT-Scan app has the ability to order a laboratory confirmation test within the app workflow. In the event of an inconclusive test result, confirmation testing is advised. If the test result was negative and confirmation testing is not needed, this step of the procedure can be skipped.
- Following an inconclusive result, tap the “done” button to begin the lab order.
- Select the oral fluid device used for confirmation. OralTox allows for confirmation testing with the same original sample. Tap continue.
- On the next screen, collect the donor’s signature for documentation.
- Scan the barcode located on the security seal provided by Premier Biotech.
- Have the donor write the date and initial in the designated space on the security seal.
- Remove the security seal and place it over the center/top of the OralTox device cap and down both sides. Note: Align the “Center Over Cap” area to the top of the OralTox device cap and adhere the remainder of the security seal down both sides as shown. Be sure NOT to cover the device QR Code.
- Place the OralTox device into the clear biohazard shipping bag and seal it.
- Enter donor’s phone number in the app in the event they need to be contacted and tap ok.
- On the next screen, it will show you that your order has been received by the lab.
- Place the specimen bag into the shipping bag, seal it, and ensure the shipping label is adhered to the bag as shown below. Place the sample in the designated
pickup/shipping area. This concludes the confirmation/shipping procedure.


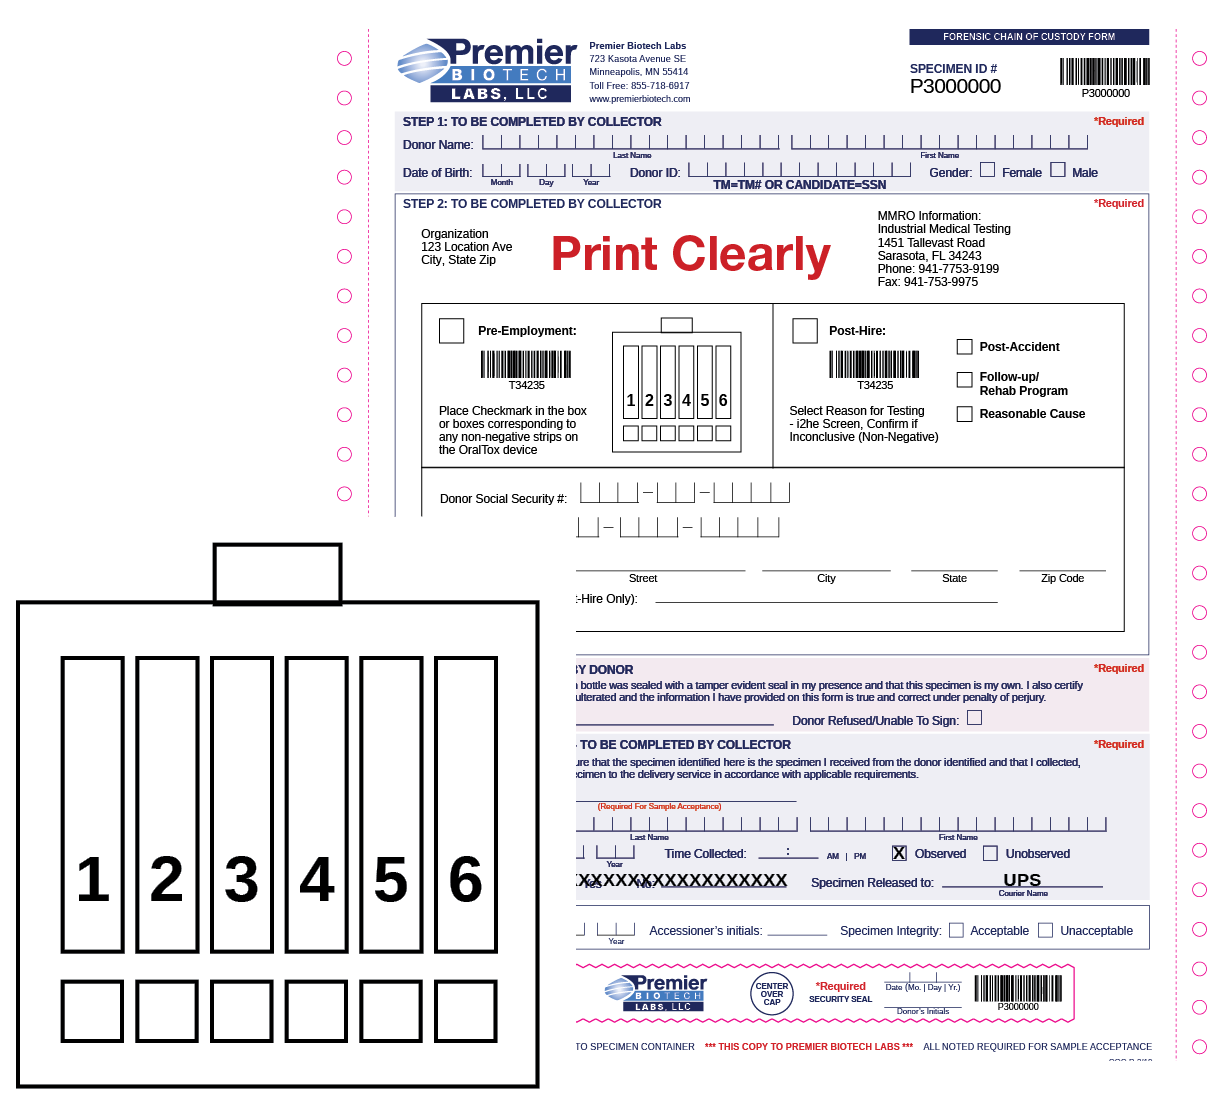
Chain of Custody (Shipping The Sample) Manual Procedure
1. Complete the light blue (Collector) sections of the chain of custody form.
2. Place check mark in the box or boxes corresponding to any inconclusive strips (identified by the OT-Scan app) on the OralTox device in the designated area (step #2) of the chain of custody form. (when applicable – covered strips only)
3. Have the donor/candidate complete the light red sections on the chain of custody form including signature, date/initials on the security seal, etc.
4. Take the security seal located at the bottom of the chain of custody form and place it over the center/top of the OralTox device cap.
Note: Align the “Center Over Cap” area to the top of the OralTox device cap and adhere the remainder of the security seal down both sides of the OralTox device.
5. Place the sealed device and the top copy of the completed chain of custody form into the specimen bag and seal it.
6. Place the specimen bag into the shipping bag, seal it, and place it in the designated pickup/shipping area.
7. File the remaining copies of the chain of custody form in the designated location defined by your organization.
Important: Failure to have the donor/candidate sign, date and initial the chain of custody form invalidates the test. Please be sure to complete the chain of custody form in its entirety.

iPhone Setup (Premier Biotech Provided Devices Only)
1. Power the Iphone by holding the power button (top-right side)
2. From the Hello screen, choose language and country of region
3. Next, choose the Wi-Fi network and enter the password to connect to the Internet
Location Services can be enabled
Skip the “Touch ID” process to avoid confusion with multiple users
4. Select a pass code (series of numbers) that will be used to unlock the phone
Important: Be sure to save the pass code in a safe and secure place
Select “Set Up As New Iphone”
When the Apple ID is requested, insert the email/password provided by Premier
Important: All credentials are CASE SENSITIVE
Select “Turn on Siri Later” as Siri is not needed
Select “Don’t Send” for the diagnostics question
Select “Don’t Share” for the app analytics question
Select “Standard View”
Select “Get Started” to conclude the initial iphone setup
Updating The App
(Premier Biotech will notify users when updates are required)
1. Open the App Store by tapping the App Store icon.
2. Tap the “Today” tab at the bottom and the “Profile Icon” on the top right.
3. Scroll down and tap “Update”
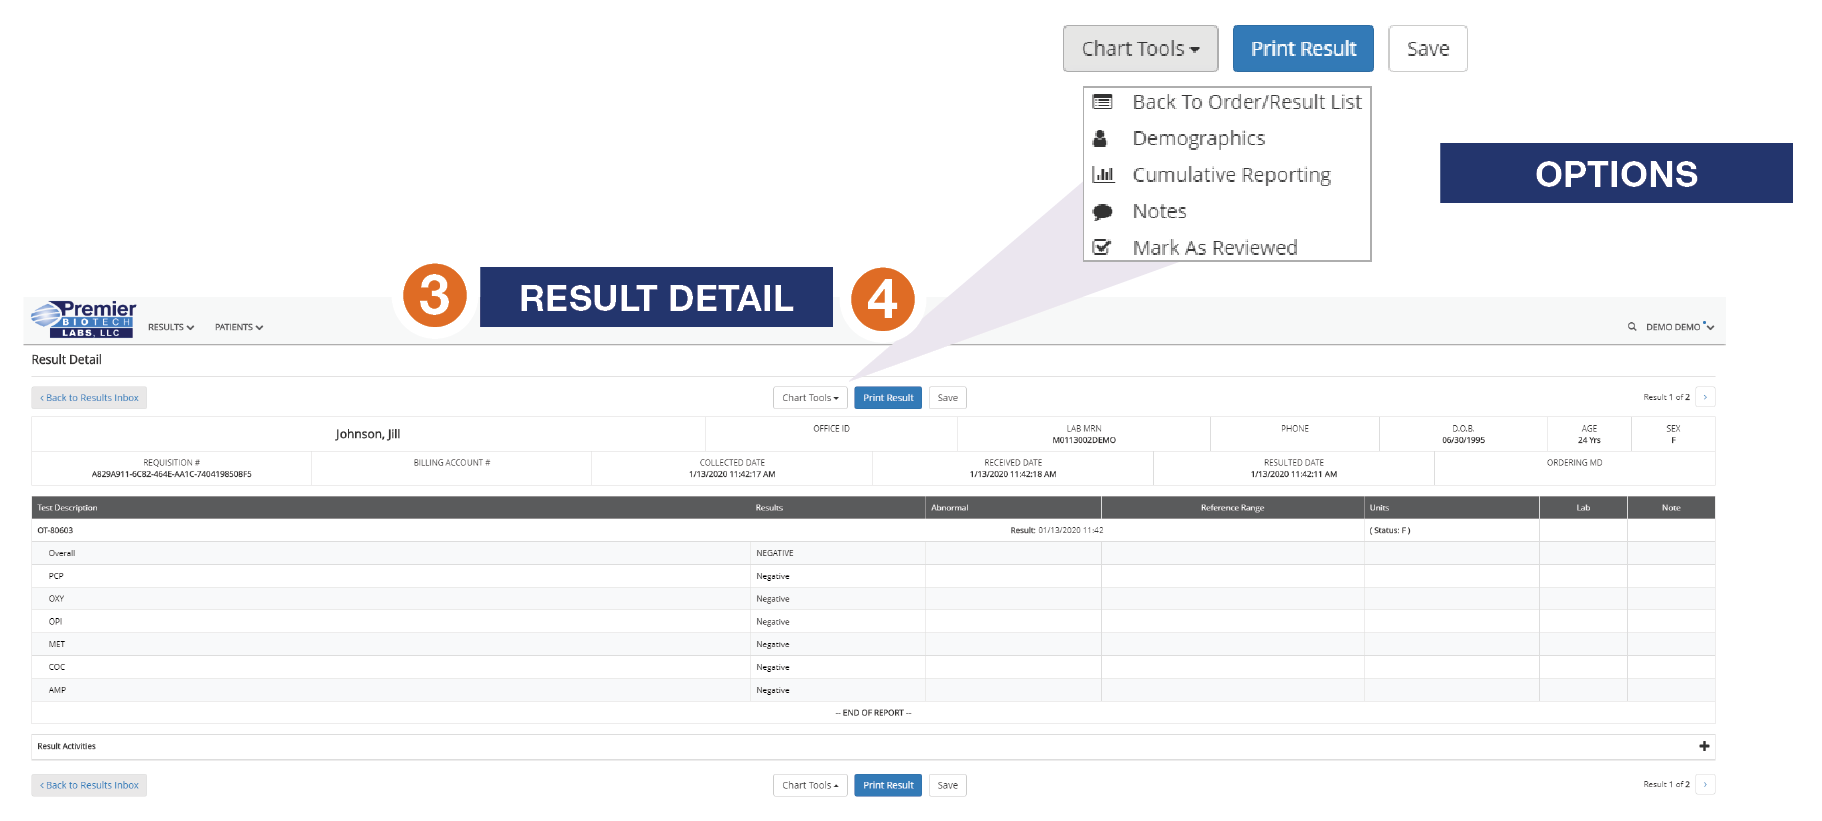
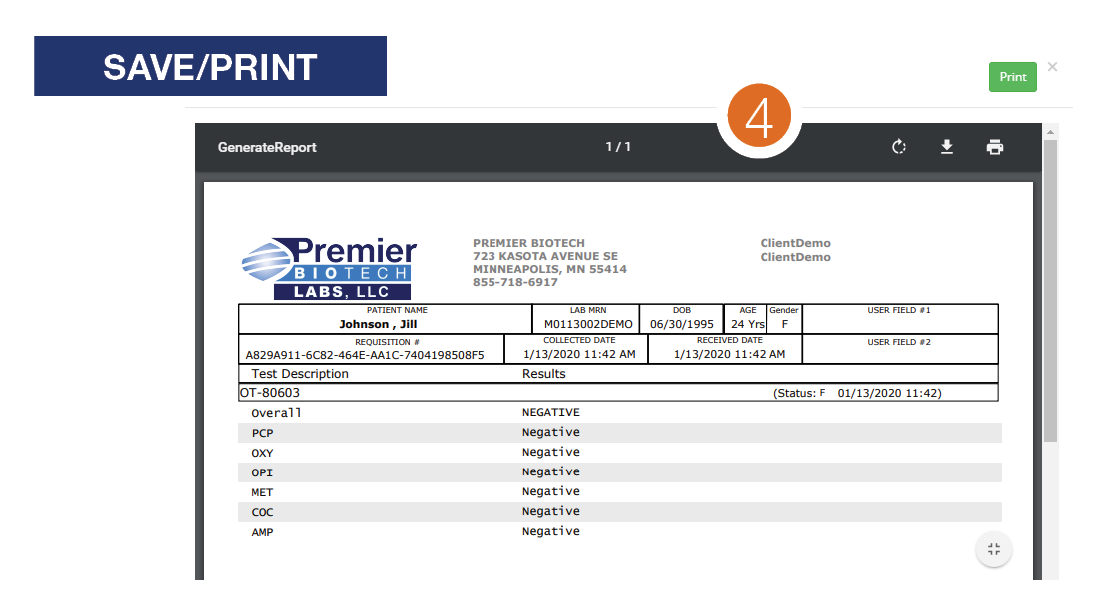
Accessing Results Via The OT-Scan Portal
Data captured by the OT-Scan app is sent securely for result retrieval in real-time.
1. Login and enter credentials at: premierbiotech.careevolve.com
2. The “Results Inbox” shows all captured results by name, date and requisition.
3. Click the “Donor’s Name” to access the individual “Result Detail” page.
4. Individual results can be printed via the “Print Result” button and additional
“Chart Tools” are also available for advanced data and reporting.

Troubleshooting Possible Scenarios
The following showcase possible scenarios that can occur when proper collection best practices are not followed. To ensure the validity of the OralTox/OT-Scan test results, pay close attention to each of the steps and timing requirements outlined throughout this Procedure Guide.
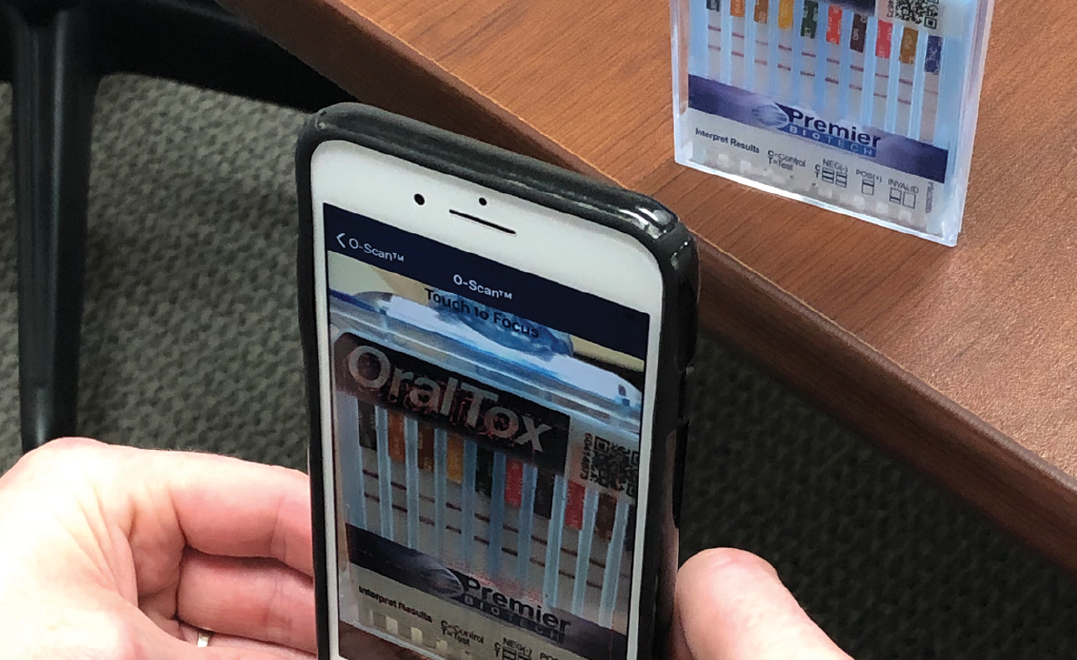
Aligning The App Indicator Lines With The Device:
As you get used to aligning the OT-Scan App scan guides with the OralTox device label, the following actions can help. Begin the capture process close to the device (Aprox. 2 inches away) and slowly pan outwards while gently tilting the phone to align the edges of the guide with the OralTox label.
Keeping the OralTox device on a flat surface can also help so your not required to compete with aligning both the device and phone at the same time. Once aligned, you can try tapping the middle of the screen allowing the camera to focus on the middle point. This should aid in completing the app capture process.
The Result Capture Is Taking Longer Than Normal:
In the event there is a glare or strong back lighting from another light source, the app may be struggling to focus in on the read. Try moving to an area where there is adequate but consistent lighting, while limiting the possibility of stronger direct light and glare.
Some of the OralTox Strips Did Not Wick/Run:
This scenario can arise if the device did not remain on a flat surface and/or not enough oral fluid was collected. While the shape of the OralTox device fits nicely in the hand, it is important the device remain on a flat surface for the duration of the procedure.
The OralTox has a built in gravity feed to ensure ample oral fluid distribution. Observe their is sufficient oral fluid coming in contact with each strip. If not, the donor may have removed the swab too soon or may have not twisted the collection swab/handle to the fully locked in position.
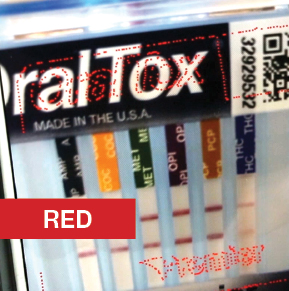
The Strip Is Not Turning Color:
If the indicator strip is not turning color, the donor more than likely is not saturating the swab enough. Prior to collection, instruct the donor to begin pooling saliva in their mouth as this will speed up the procedure.
Once the donor has swept the inside of the mouth, the swab should remain in their mouth until color appears. The donor should not be removing the swab to talk or tamper (biting, sucking or chewing) with the swab. Some donors may have a dryer mouth. Nerves can also play a factor in this, so instructing them to pool saliva ahead of time will help ensure ample oral fluid specimen.
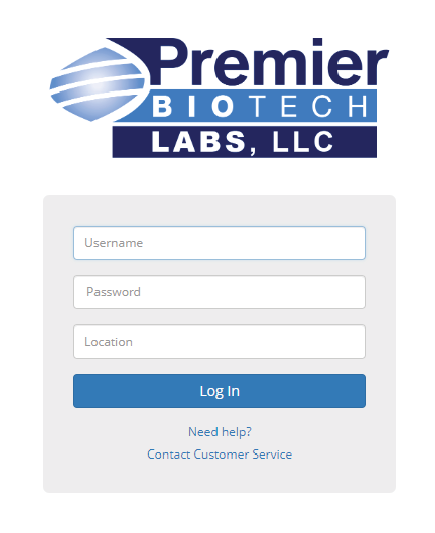
Self-Service Password Reset
- Open up your web browser and type in the following URL: https:/premierbiotech.careevolve.com/
- Click on the Need Help?
- ‘I forgot my password – Defaults, then Select Continue
- A prompt will display to enter your Email and Location, then click Reset Password
- Check your email, and you will see an email, click the link in email to reset your password.


Email Premier Biotech Support
To request additional support, please complete the email form below and one of our OT-Scan support members will contact you back with assistance. You may also contact us by phone at: 888-686-9909. Premier Biotech’s Customer Service hours of operation are Monday – Friday 7am-7pm EST.
